Saturday, February 6, 2010

AVCHD timecode update

After this post I got some infos from a cat, which helped me to understand the AVCHD metadata format much better. This post summarizes, what I currently know.

AVCHD metadata are stored in an SEI message of type 5 (user data unregistered). These messages start with a GUID (indicating the type of the data). The rest is not specified in the H.264 spec. For AVCHD metadata the data structure is as follows:

1. The 16 byte GUID, which consists of the bytes

0x17 0xee 0x8c 0x60 0xf8 0x4d 0x11 0xd9 0x8c 0xd6 0x08 0x00 0x20 0x0c 0x9a 0x66

2. 4 bytes

0x4d 0x44 0x50 0x4d

which are "MDPM" in ASCII.

3. One byte, which specifies the number of tags to follow

4. Each tag begins with one byte specifying the tag type followed by 4 bytes of data.

The date and time are stored in tags 0x18 and 0x19.

Tag 0x18 starts with an unknown byte. I saw values between 0x02 and 0xff in various files. It seems however that it has a constant value for all frames in a file. The 3 remaining bytes are the year and the month in BCD coding (0x20 0x09 0x08 means August 2009).

The 4 bytes in tag 0x19 are the day, hour, minute and second (also BCD coded).

There are more informations stored in this SEI message, check here for a list.

If you want to make further research on this, you can download gmerlin-avdecoder from CVS, open the file lib/parse_h264.c and uncomment the following line (at the very beginning):

// #define DUMP_AVCHD_SEI

Then you can use bgavdump on your files. It will decode the first 10 frames from the file. If you want to decode e.g. 100 frames, use

bgavdump -nf 100 your_file.mts

Wednesday, January 27, 2010

Video quality characterization techniques

When developing video processing algorithms and tuning them for quality, one needs proper measurement facilities, otherwise one will end up doing voodoo. This post introduces two prominent methods for calculating the differences of two images (the "original" and the "reproduced" one) and get a value, which allows to estimate, how well the images coincide.

PSNR
The most prominent method is the PSNR (peaked signal-to-noise ratio). It is based on the idea, that the reproduced image consists of the original plus a "noise signal". The noise level can be characterized by the signal-to-noise ratio and is usually given in dB. Values below 0 dB mean that the noise power is larger than the signal. For identical images (zero noise), the PSNR is infinite.

Advantage is, that it's a well established method and the calculation is extremely simple (see here for the formula). Disadvantage is, that it is a purely mathematical calculation of the noise power, while the human psychovisual system is completely ignored.

Thus, one can easily to make 2 images, which have different types of compression artifacts (i.e. from different codecs) and have the similar PSNR compared to the original. But one looks much better than the other. Therefore, current opinion among specialists is, that PSNR can be used or optimizing one codec, while it fails for comparing different codecs. Unfortunately, many codec comparisons in the internet still use PSNR.

SSIM
SSIM (structural similarity) was fist suggested by Zhou Wang et.al. in the paper "Image Quality Assessment: From Error Visibility to Structural Similarity" (IEEE Transactions on image processing, Vol. 13, No. 4, April 2004, PDF).

The paper is very well written and I recommend anyone, who is interested, to read it. In short: The structural similarity is composed of 3 values:
  • Luminance comparison
  • Contrast comparison
  • Structure comparison
All these components are normalized such that they are 1.0 for identical images. The SSIM index is the product of the 3 components (optionally raised by an exponent). Obviously the product will be normalized as well.

A difference to PSNR is, that the SSIM index for a pixel is calculated by taking the surrounding pixels into account. It calculates some characteristic numbers known from statistics: The mean value, the standard deviation and correlation coefficient.

One problem with the SSIM is, that the algorithm has some free parameters, which are slightly different in each implementation. Therefore you should be careful when comparing your results with numbers coming from a different routine. I took the parameters from the original paper, i.e. K1 = 0.01, K2 = 0.03 and an 11x11 Gaussian window with a standard deviation of 1.5 pixels.

Implementations
Both methods are available in gavl (SSIM only in CVS for now), but their APIs are slightly different. To calculate the PSNR, use:
void gavl_video_frame_psnr(double * psnr,
const gavl_video_frame_t * src1,
const gavl_video_frame_t * src2,
const gavl_video_format_t * format);

The src1, src2 and format arguments are obvious. The result (already in dB) is returned in psnr for each component. The order is RGB(A), Y'CbCr(A) or Gray(A) depending on the pixelformat. PSNR can be calculated for all pixelformats, but usually one will use a Y'CbCr format and take only the value for the Y' component. In all my tests the PSNR values for chrominance were much higher, so the luminance PSNR is the most pessimistic (i.e. most honest) value.

For SSIM you can use:
int gavl_video_frame_ssim(const gavl_video_frame_t * src1,
const gavl_video_frame_t * src2,
gavl_video_frame_t * dst,
const gavl_video_format_t * format);
The arguments src1, src2 and format are the same as for PSNR. The pixelformat however must be GAVL_GRAY_FLOAT, implying that only the luminance is taken into account. This decision was made after the experiences with PSNR. The SSIM indices for each pixel is then returned in dst, which must be created with the same format. The MSSIM (mean SSIM) for the whole image can then be obtained by averaging the SSIM values over all pixels. The function returns 1 if the SSIM could be calculated or 0 if the pixelformat was not GAVL_GRAY_FLOAT or the image is smaller than the 11x11 window.

It never matters which image is passed in src1 and which in src2 because both algorithms are symmetric.

Example
Below you see 11 Lena images compressed with libjpeg at quality levels from 0 to 100 along with their PSNR, SSIM and file size:


Quality: 0, PSNR: 23.54 dB, SSIM: 0.6464, Size: 2819 bytes



Quality: 10, PSNR: 29.84 dB, SSIM: 0.8473, Size: 4305 bytes



Quality: 20, PSNR: 32.74 dB, SSIM: 0.9084, Size: 5890 bytes



Quality: 30, PSNR: 34.38 dB, SSIM: 0.9331, Size: 7376 bytes



Quality: 40, PSNR: 35.44 dB, SSIM: 0.9460, Size: 8590 bytes



Quality: 50, PSNR: 36.31 dB, SSIM: 0.9549, Size: 9777 bytes



Quality: 60, PSNR: 37.16 dB, SSIM: 0.9612, Size: 11101 bytes



Quality: 70, PSNR: 38.34 dB, SSIM: 0.9688, Size: 13034 bytes



Quality: 80, PSNR: 40.00 dB, SSIM: 0.9768, Size: 16410 bytes



Quality: 90, PSNR: 43.06 dB, SSIM: 0.9863, Size: 24308 bytes



Quality: 100, PSNR: 58.44 dB, SSIM: 0.9993, Size: 94169 bytes


With these numbers I made a plot, which shows the PSNR and SSIM as a function of the JPEG quality:
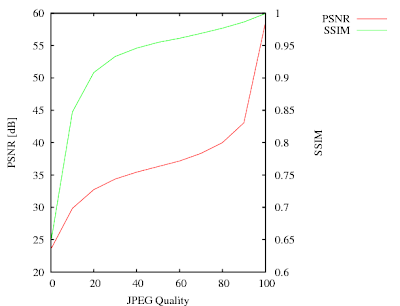
The JPEGs have the most visible differences for qualities between 0 and 40. In this range the SSIM curve has the largest gradient. Above 40 (where the visual quality doesn't change much), the SSIM becomes more or less linear and reaches almost 1 for the best quality.

The PSNR curve is a bit misleading. It has the steepest gradient for the highest quality. This is understandable because PSNR would become infinite for the lossless (perfect quality) case. It has however not much to do with the subjective impression. PSNR however is better for fine-tuning codecs at very high quality levels. That's because the PSNR values will change more strongly, while SSIM will always be almost one.

Now I have the proper tools to make a comparison of different video codecs.

Sunday, January 24, 2010

Disabling the X11 screensaver from a client

One of the most annoying experiences when watching videos with friends on cold winter evenings is, when the screensaver starts. Media players therefore need a way to switch that off by one or several means.

The bad news is, that there is no official method for such a trivial task, which works on all installations. In addition, there is the energy saving mode, which has nothing to do with the screensaver, and must thus be disabled separately.

The Xlib method
You get the screensaver status with XGetScreenSaver(), disable it with XSetScreenSaver() and restore it after video playback. Advantage is, that this method is core X11. Disadvatage is, that it never works.

Old gnome method
Older gnome versions had a way to ping the screensaver by executing the command:

gnome-screensaver-command --poke > /dev/null 2> /dev/null

Actually pinging the screensaver (which resets the idle timer) is a better method, because it restores the screensaver even if the player got killed (or crashed). The bad news is, that starting with some never gnome version (don't know exactly which), this stopped working. To make things worse, the command is still available and even gives zero return code, it's just a noop.

KDE
I never owned a Linux installation with KDE. But with a little help from a friends, I found a method. My implementation however is so ugly, that I won't show it here :)

The holy grail: Fake key events
After the old gnome variant stopped working for me, I finally found the XTest extension. It was developed to test XServers. I abuse it to send fake key events, which are handled indentically to real keystrokes. They will reset the idle counters of all screensaver variants, and will also disable the energy saving mode.

Also it's a ping approach (with the advantage described above). But it works with an X11 protocol request instead of forking a subprocess, so the overhead will be much smaller. The documentation for the XTest extension is from 1992, so I expect it to be present on all installations, which are sufficiently new for video playback.

Here is how I implemented it:

1. Include <X11/extensions/XTest.h>, link with -lXtst.

2. Test for presence of the XTest extension with XTestQueryExtension()

3. Get the keycode of the left shift key with XKeysymToKeycode()

4. Each 40 seconds, I press the key with

XTestFakeKeyEvent(dpy, keycode, True, CurrentTime);

5. One video frame later, I release the key with

XTestFakeKeyEvent(dpy, keycode, False, CurrentTime);

The one frame delay was done to make sure, that the press and release events will arrive with different timestamps. I don't want to know, what happens if press- and release-events for a key have identical timestamps.

This method will hopefully work forever, no matter what crazy ideas the desktop developers get in the future. Also, this is one more reason not to use any GUI toolkit for video playback. If you use Xlib and it's extensions, you have full access to all available features of X. When using a toolkit, you have just the features the toolkit developers think you deserve.

Tuesday, January 19, 2010

Gmerlin release on the horizon

New gmerlin prereleases are here:

http://gmerlin.sourceforge.net/gmerlin-dependencies-20100119.tar.bz2

http://gmerlin.sourceforge.net/gmerlin-all-in-one-20100119.tar.bz2

Changes since the last public release are:
  • Great player simplification. Most changes are internal, but the user should notice much faster seeking. Also the GUI player now updates the video window while the seek-slider is moved.
  • Simplification of the plugin configuration: In many places, where we had an extra dialog for configuring plugins, it was merged with the rest of the configuration.
  • A new recorder application which records audio (with OSS, Pulseaudio, Alsa, Jack and ESound) and video (with V4L1, V4L2 or the new X11 grabber). Output can be written into files or broadcasted.
  • A new encoding frontend (used by the recorder and transcoder), which allows more consistant and unified configuration of encoding setups.
  • The video window of the GUI player has now a gmerlin icon and is grouped together with the other windows.
  • Like always: Tons of fixes, optimizations and smaller cleanups in all packages. Got another 18% speedup when building AVCHD indexes for example.
This will be the last gmerlin release of the 0.3.X series. There are just 2 major features left, which keep me from releasing 1.0.0:
  • Support for compressed A/V frames in the architecture. This should allow lossless transmultiplexing with the transcoder.
  • Support for configuration presets: This will make using gmerlin applications much easier. The presets can be shared among application, i.e. once you found a good encoding preset, you can use it both in the transcoder and the recorder.


Please test it as much as you can and sent problem reports to the gmerlin-general list.

Monday, December 14, 2009

Flash-free live web video solution

Some time ago, we all knew that video on the web was equivalent to the proprietary Flash technology. Also I used to say, that there might be political or psychological reasons for using Ogg/Theora, but never technical ones.

Well, the conditions have changed recently so it's time to bring an update on this.

HTML 5 video tag
The HTML 5 draft supports a <video> tag for embedding a video into a webpage as a native html element (e.g. without a plugin). Earlier versions of the draft even recommended that browsers should support Ogg/Theora as a format for the video. The Ogg/Theora recommendation was then removed and a lot of discussion was started around this. This wikipedia article summarizes the issue. Nevertheless, there are a number of browsers supporting OggTheora video out of the box, among these is Firefox-3.5.

Cortado plugin
In a different development, the Cortado java applet for theora playback was written. It is GPL licensed and you can just download it and put it into your webspace.

Now the cool thing about the <video> tag is, that browsers, which don't know about it, will display the contents between <video> and </video>, so you can include the applet code there. Researching a bit about the best way to do this, I read that the (often recommended) <applet> mechanism is not valid html. A better solution is here.

Webmasters side
Now if you have the live-stream at http://192.168.2.2:8000/stream.ogg your html page will look like:
<html>
<head>
<meta http-equiv="content-type" content="text/html; charset=ISO-8859-1">
</head>
<body>
<h1>Test video stream</h1>
<video tabindex="0"
src="http://192.168.2.2:8000/stream.ogg"
controls="controls"
alt="Test video stream"
title="Test video stream"
width="320"
height="240"
autoplay="true"
loop="nolooping">
<object type="application/x-java-applet"
width="320" height="240">
<param name="archive" value="cortado.jar">
<param name="code" value="com.fluendo.player.Cortado.class">
<param name="url" value="http://192.168.2.2:8000/stream.ogg">
<param name="autoplay" value="true">
<a href="http://192.168.2.2:8000/stream.ogg">Test video stream</a>
</object>
</video>
</body>
</html>

Note that for live-streams the "autoplay" option should be given. If not, firefox will try to load the first image (automatically anyway) to show it in the video widget. Then it will stop downloading the live-stream until you click start. Pretty obvious that this will mess up live-streaming.


Server side
For live streaming I just installed the icecast server, which came with my ubuntu. I just changed the passwords in /etc/icecast/icecast.xml, enabled the server in /etc/default/icecast2 and started it with /etc/init.d/icecast2 start.

Upstream side
There are lots of programs for streaming to icecast servers, most of them use libshout. I decided to create a new family of plugins for gmerlin: Broadcasting plugins. They have the identical API as encoder plugins (used by the transcoder or the recorder). The only difference is, that they don't produce regular files and must be realtime capable.

Using libshout is extremely simple:
  • Create a shout instance with shout_new()
  • Set parameters with the shout_set_*() functions
  • Call shout_open() to actually open the connection to the icecast server
  • Write a valid Ogg/Theora stream with shout_send(). Actually I took my already existing Ogg/Theora encoder plugin and replaced all fwrite() calls by shout_send().
See below for the libshout configuration of the gmerlin Ogg broadcaster.


Of course, some minor details were left out in my overview, read the libshout documentation for them. As upstream client, I use my new recorder application.

The result
See below a screenshot from firefox while it plays back a live stream:


Open Issues
The live-video experiment went extremely smooth. I discovered however some minor issues, which could be optimized away:
  • Firefox doesn't recognize live-streams (i.e. streams with infinite duration) properly. It displays a seek-slider which always sticks at the very end. Detecting a http stream as live can easily be done by checking the Content-Length field of the http response header.
  • The theora encoder (1.1.1 in my case) might be faster than the 1.0.0 series, but it's still way too slow. Live encoding of a 320x240 stream is possible on my machine but 640x480 isn't.
  • The cortado plugin has a loudspeaker icon, but no volume control (or it just doesn't work with my Java installation)
Other news
  • With the video switched off I can send audio streams to my wlan radio. This makes my older solution (based on ices2) obsolete.
  • The whole thing of course works with prerecorded files as well. In this case, you can just put the files into your webspace and your normal webserver will deliver them. No icecast needed.

Sunday, December 6, 2009

Introducing Gmerlin recorder

Gmerlin-recorder is a small application, which records audio and video from hardware devices. It was written as a more generic application, which should eventually replace camelot. See below for a screenshot:

As sources, we support:
  • Audio devices via OSS, Alsa, Esound, Pulseaudio and Jack
  • Webcams via V4L and V4L2
  • X11 grabbing
For monitoring you see the video image in the recorder window. For the audio you have a vumeter. With recorded streams you can do lots of stuff:
  • Filter the streams using gmerlin A/V filters
  • Write the streams to files using gmerlin encoder plugins
  • Send the encoded stream to an icecast server (will be described in detail in another blog post)
  • Save snapshots to images either manually or automatically
With all these features combined in the right way, you can use gmerlin-recorder for a large number of applications:
  • Make vlogs with your webcam and a microphone
  • Digitize analog music
  • Make a video tutorial for your application
  • Start your broadcasting station
  • Send music from your stereo to your WLAN radio
  • Make stop-motion movies
  • ...
Until the recorder can fully replace camelot, we need the following features, which are not there yet:
  • Fullscreen video display
  • Forwarding of the video stream via vloopback

Sunday, November 15, 2009

X11 grabbing howto

One gmerlin plugin I always wanted to program was an X11 grabber. It continuously grabs either the entire root window, or a user defined rectangular area of it. It is realized as a gmerlin video recorder plugin, which means that it behaves pretty much like a webcam.

Some random notes follow.

Transparent grab window
The rectangular area is defined by a grab window, which consists only of a frame (drawn by the window manager). The window itself must be completely transparent such that mouse clicks are sent to the window below. This is realized using the X11 Shape extension:
XShapeCombineRectangles(dpy, win,
ShapeBounding,
0, 0,
(XRectangle *)0,
0,
ShapeSet,
YXBanded);
The grab window can be moved and resized to define the grabbing area. This is more convenient than entering coordinates manually. After a resize, the plugin must be reopened because the image size of a gmerlin video stream cannot change within the processing loop.

Make the window sticky and always on top
Depending on the configuration the grab window can always be on top of the other windows. There is also a sticky option making the window appear on all desktops. This is done with the collowing code, which must be called each time before the window is mapped:
if(flags & (WIN_ONTOP|WIN_STICKY))
{
Atom wm_states[2];
int num_props = 0;
Atom wm_state = XInternAtom(dpy, "_NET_WM_STATE", False);
if(flags & WIN_ONTOP)
{
wm_states[num_props++] =
XInternAtom(dpy, "_NET_WM_STATE_ABOVE", False);
}
if(flags & WIN_STICKY)
{
wm_states[num_props++] =
XInternAtom(dpy, "_NET_WM_STATE_STICKY", False);
}

XChangeProperty(dpy, win, wm_state, XA_ATOM, 32,
PropModeReplace,
(unsigned char *)wm_states, num_props);
}

Grabbing methods
The grabbing itself is done on the root window only. This will grab all other windows inside the grab area. The easiest method is XGetImage, but that allocates a new image with each call. malloc()/free() cycles within the processing loop should be avoided whenever possible. XGetSubImage() allows to pass an allocated image. Much better of course is XShmGetImage(). It was roughly 3 times faster than XGetSubImage() in my tests.

Coordinate correction
If parts of the grabbing rectangle are outside the root window, you'll get a BadMatch error (usually exiting the program), no matter which function you use for grabbing. You must handle this case and correct the coordinates to stay within the root window.

Mouse cursor
Grabbing works for everything displayed on the screen (including XVideo overlays) except the mouse cursor. It must be obtained and drawn "manually" onto the grabbed image. Coordinates are read with XQueryPointer(). The cursor image can be obtained if the XFixes extension is available. First we request cursor change events for the whole screen with
XFixesSelectCursorInput(dpy, root,
XFixesDisplayCursorNotifyMask);
If the cursor changed and is within the grabbing rectangle we get the image with
im = XFixesGetCursorImage(dpy);
The resulting cursor image is then converted to a gavl_overlay_t and blended onto the grabbed image with a gavl_overlay_blend_context_t.

Not done (yet)
Other grabbing programs deliver images only when something has changed (resulting in a variable framerate stream). This can be achieved with the XDamage extension. Since the XDamage extension is (like many other X11 extensions) poorly documented, I didn't bother to implement this yet.

One alternative is to use gmerlins decimate video filter, which compares the images in memory. The result will be the same, but CPU usage will be slightly increased.